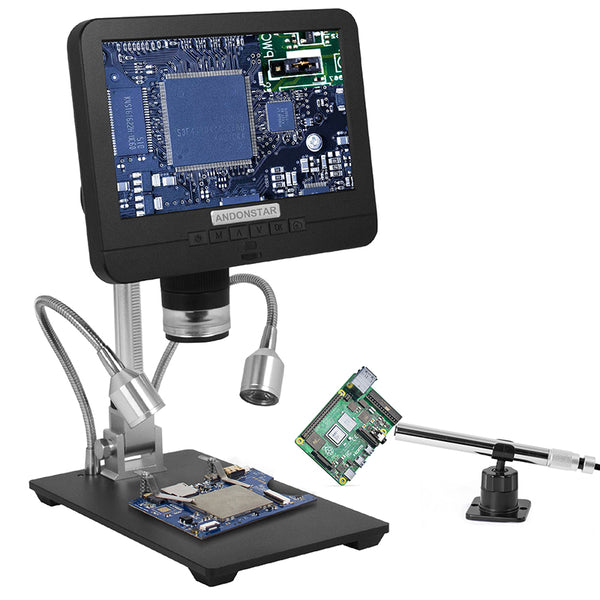
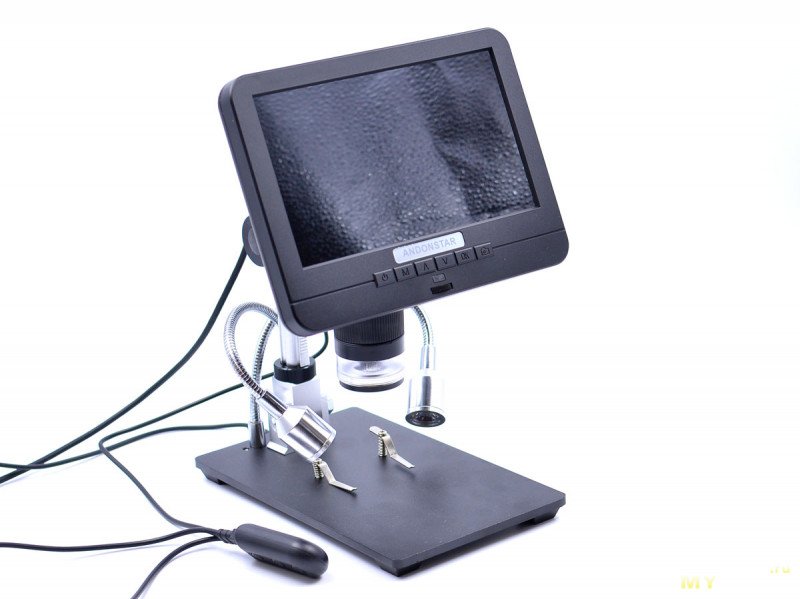
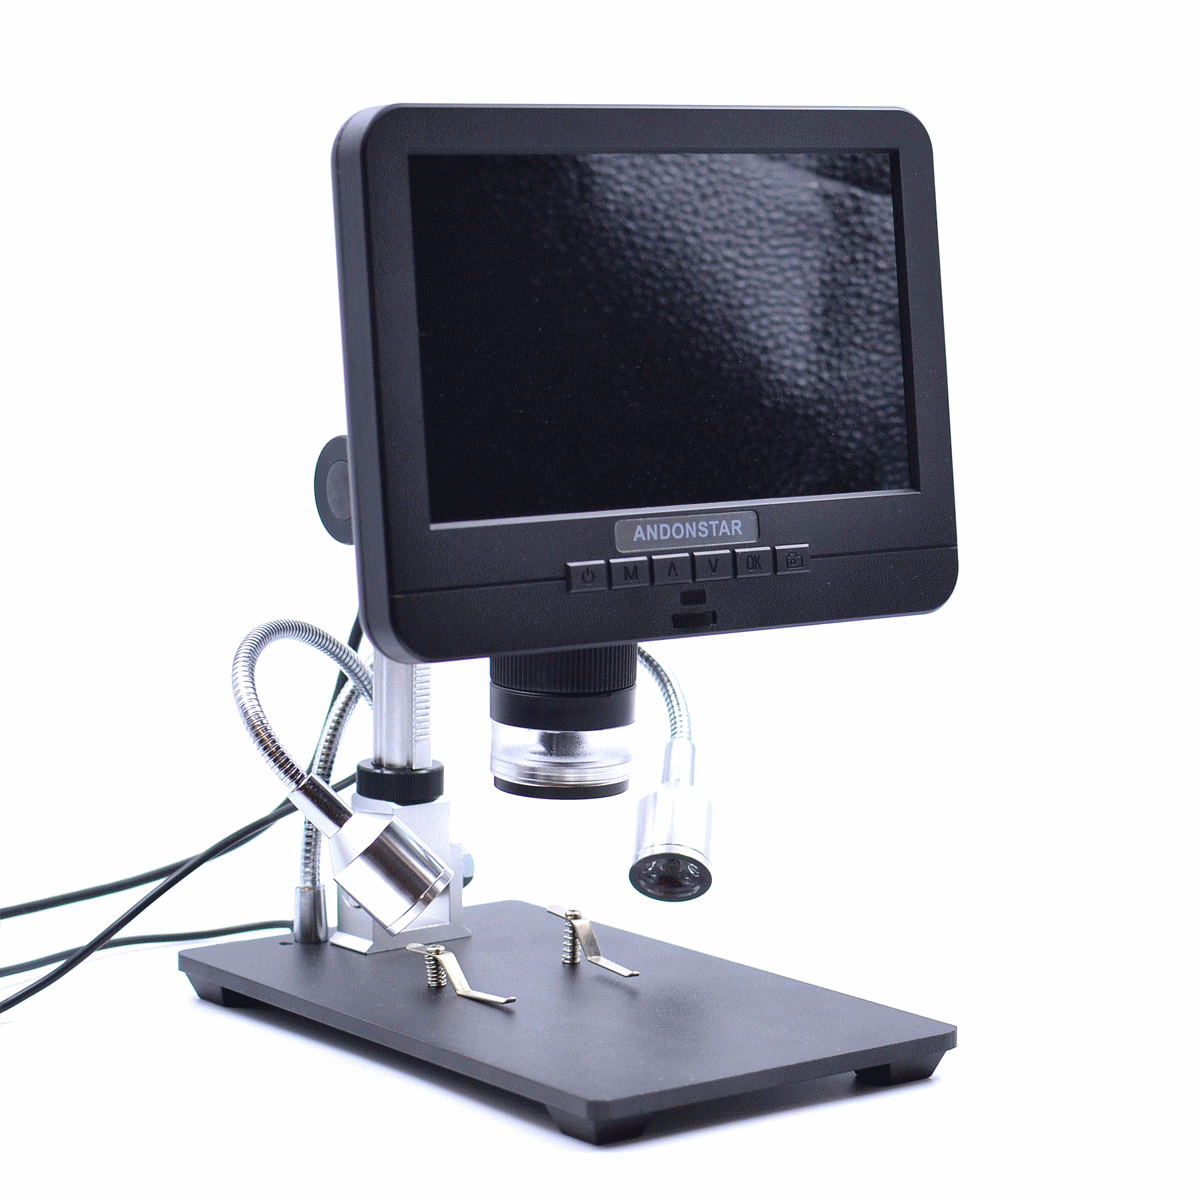
The model is not the cheapest one, but already out of the box it is a ready-made device with a screen, with an endoscope, a screen, an adjustable bracket, two LED lights with stands, two cameras and a remote control. It's quite a bit of everything here. Andonstar has been producing digital microscopes for a long time, but this model is the first thing that comes into my hands. Let's see what it is. The details of this acquaintance are as follows.
Specifications
Name - Andonstar AD206S
Video resolution - 2MP
Photo resolution - 12MP
Max. recording resolution:
- main camera - 1080p
- portable camera - 480p
Monitor - 7 "
Power supply - USB-A 5V
Warranty - 12 months


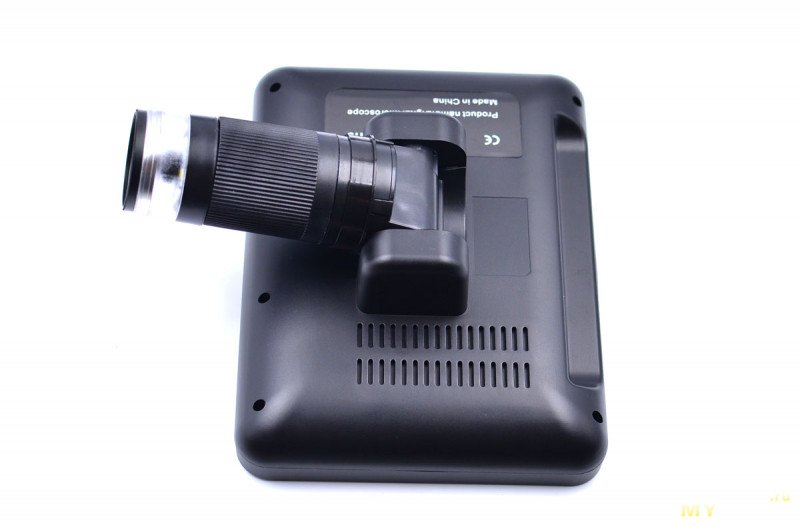
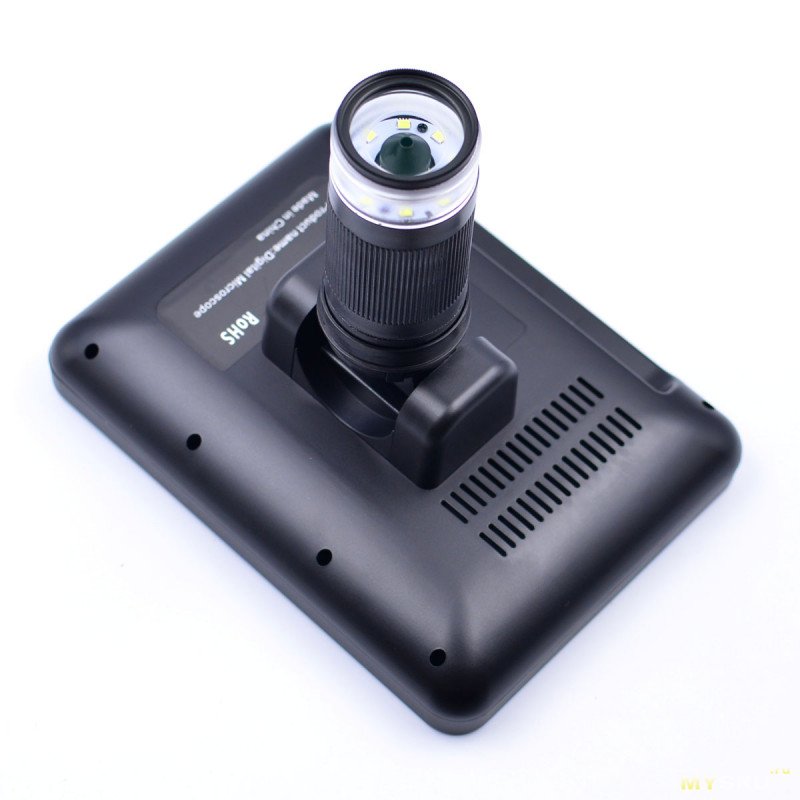
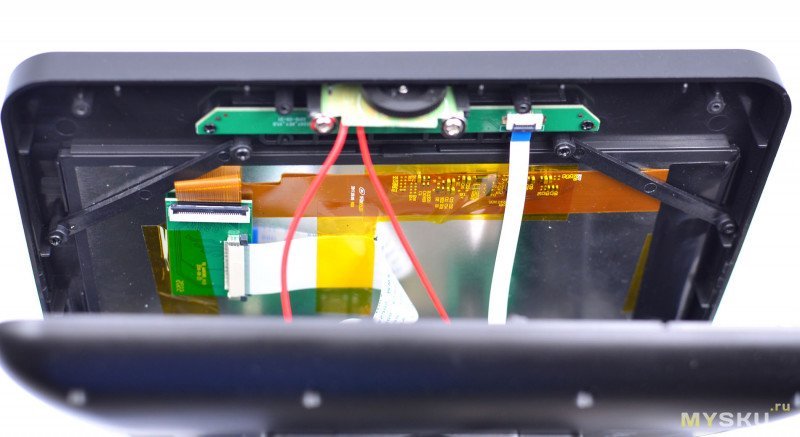
The most important part is the 7" monitor with a lens that is hinged on a swivel mount. Everything is made of plastic. The screen is covered with a protective film.

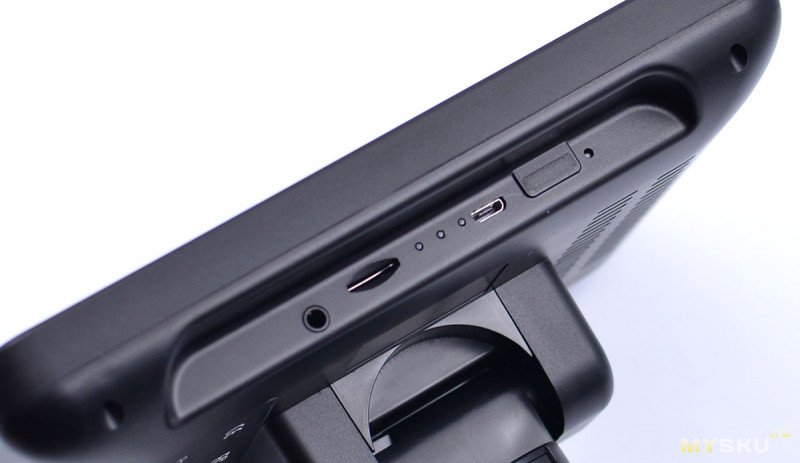
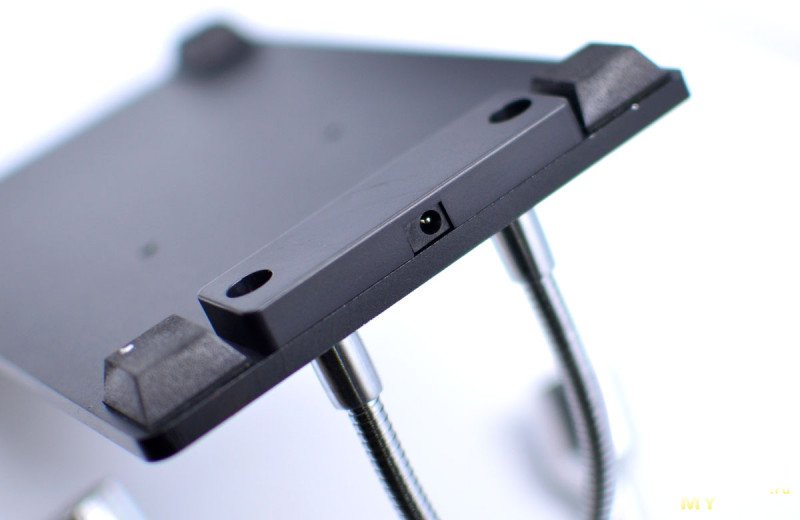
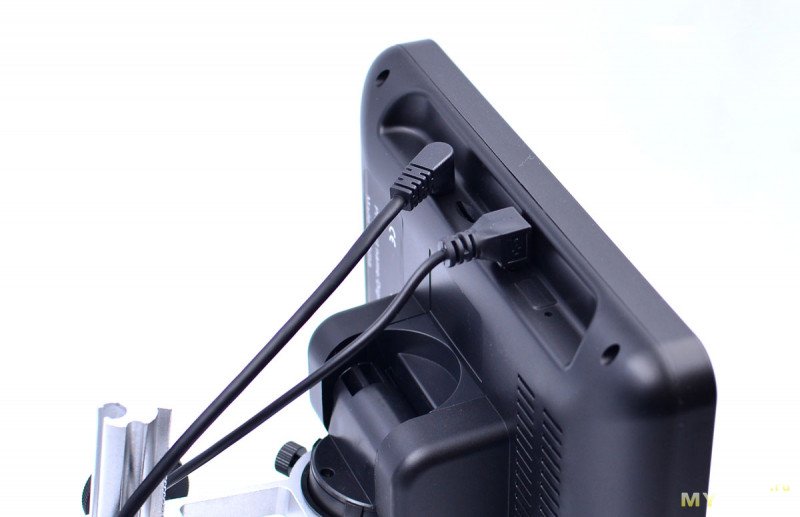
Interfaces and connectors:
- 3.5mm endoscope connection socket
- microSD card slot (up to 64gb)
- activity LEDs
- microUSB input for power and wired remote control
- Closed, unrealized connector (there should probably be a USB-A for flash drives)
- factory reset port
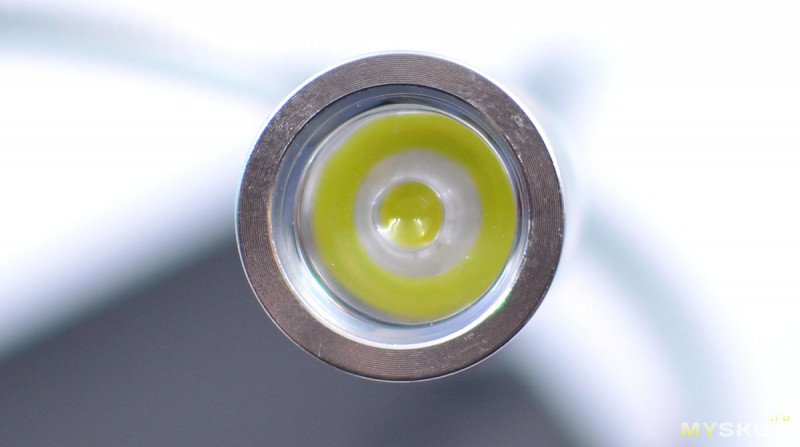
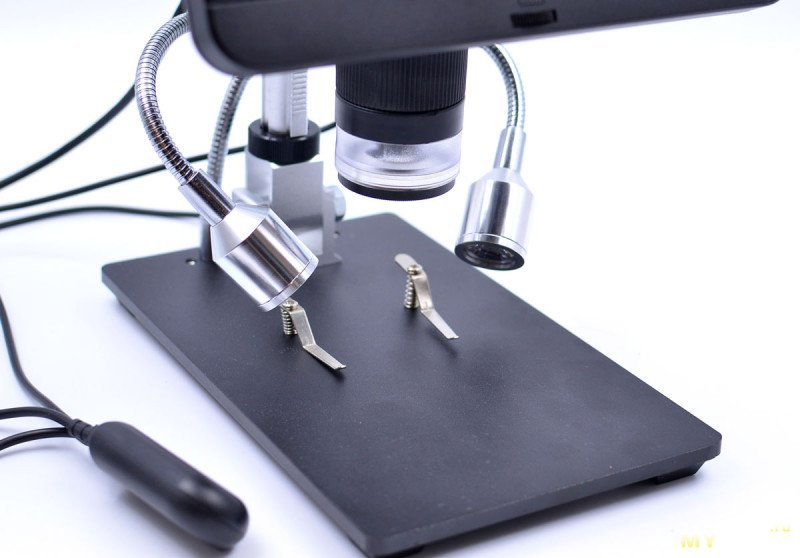
On the lens, you will notice longitudinal risks - it is a focus adjustment ring. Adjustment is smooth.
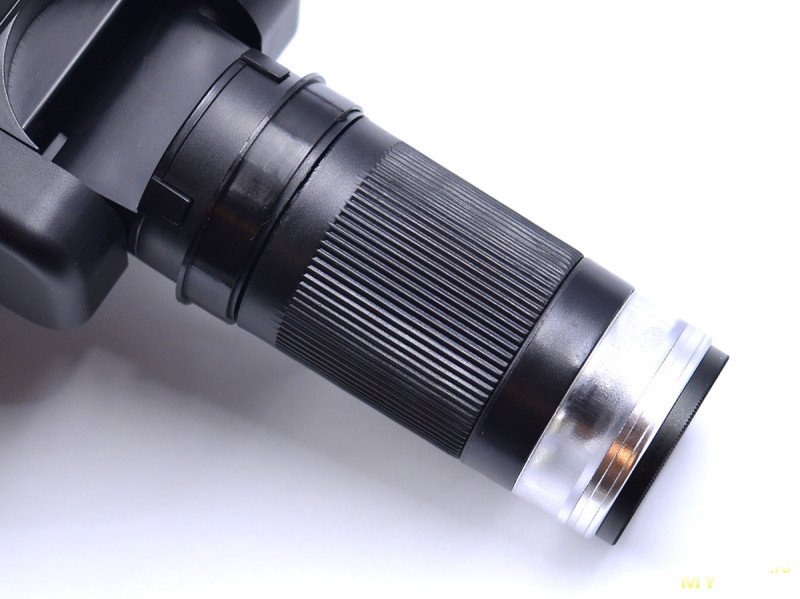
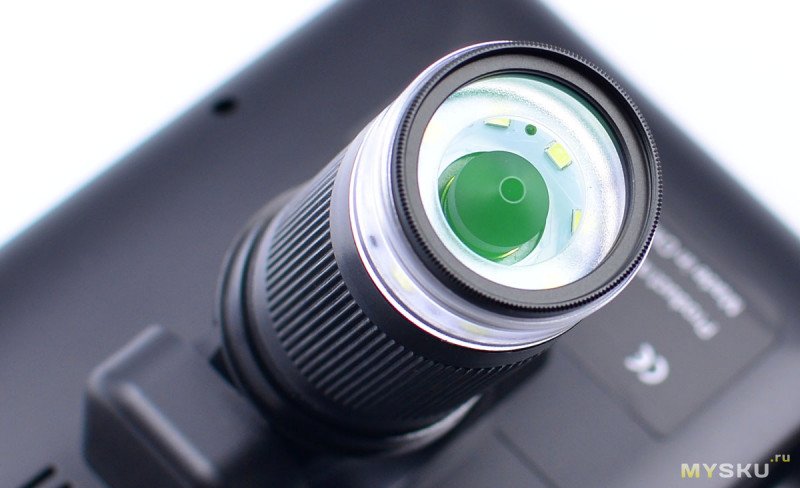
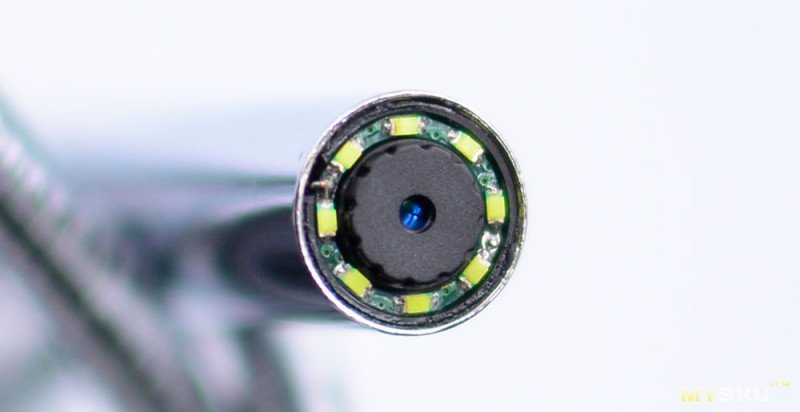
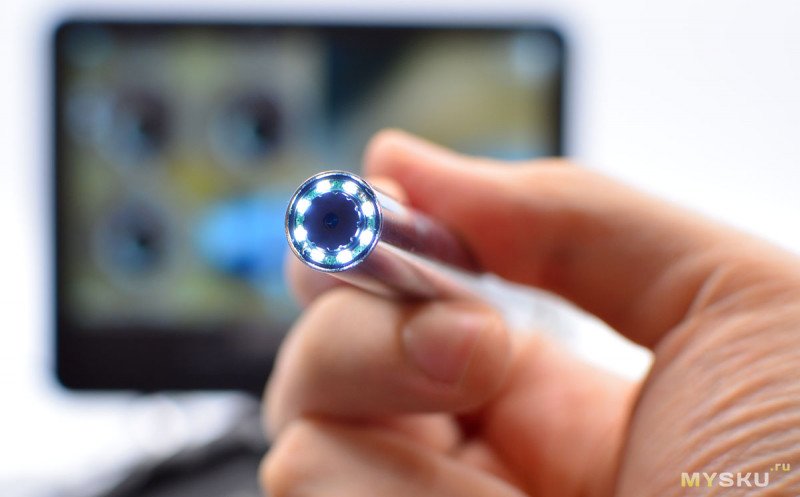
The front side of the lens is equipped with a circular illumination consisting of an array of 8 LEDs
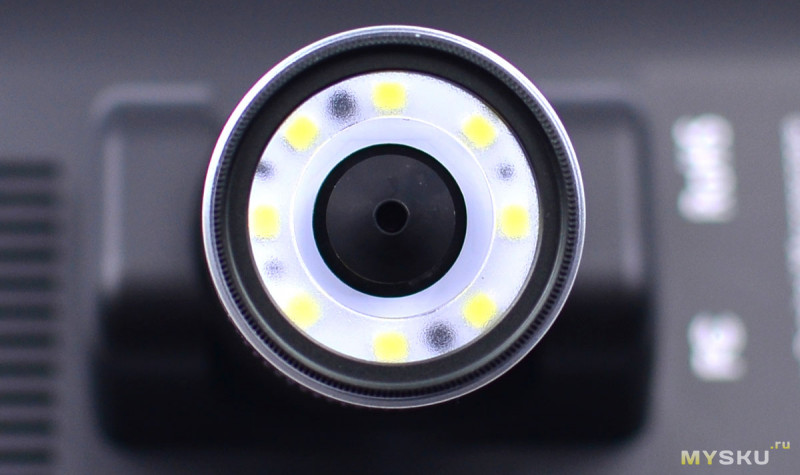
And also covered with a protective glass with UV-filter, - when looking at an angle at the greenish glare is visible.
Device controls:
- power on
- zoom, gallery (briefly), settings menu (hold)
- up arrow (works only in menu)
- down arrow (to switch the view from the endoscope, the screen on the screen, or the whole screen)
- OK (start/stop video recording)
- take a picture
- ring light adjustment wheel
- a window above the backlight adjustment wheel (IR receiver for remote)

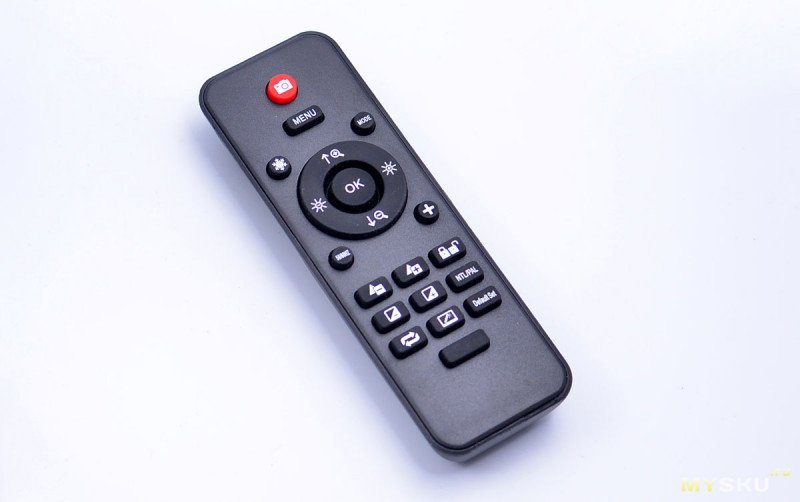
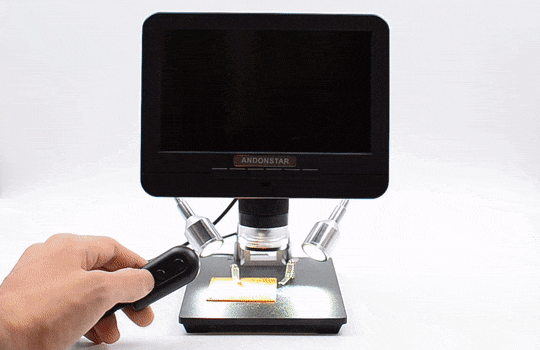
The complete remote control is more convenient and functional. Here you can start recording in one click, as well as freeze the image (HOLD), change the exposure, sharpness, discolor or invert the colors of the image, adjust the brightness of the microscope screen.
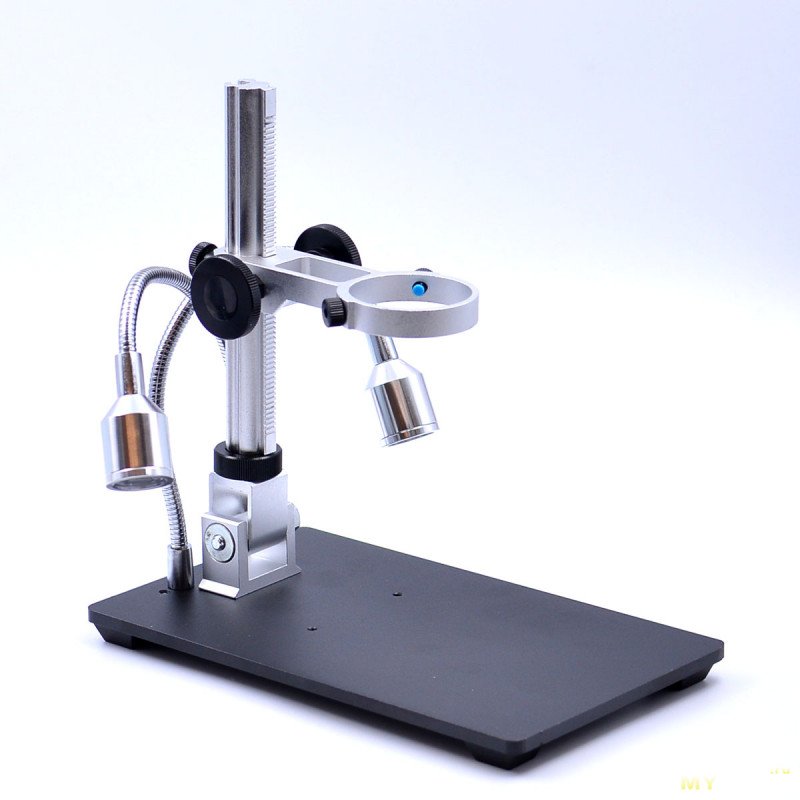
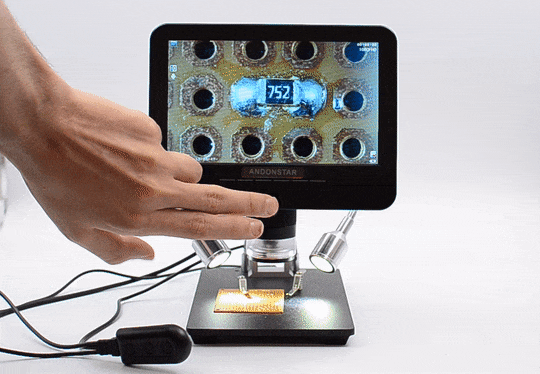
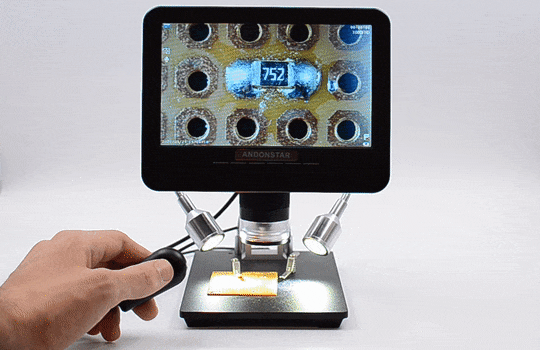
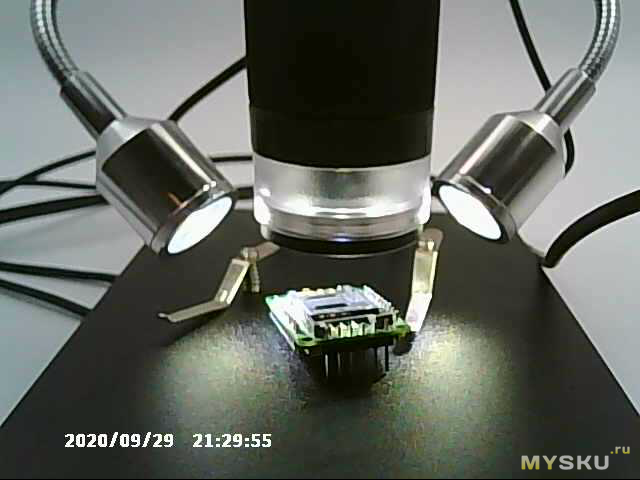
The object table is made entirely of metal. Coating - black powder paint, similar to the one used to cover computer cases. The size of the table is 12x20cm. Two powerful LEDs on flexible legs are attached to the table.
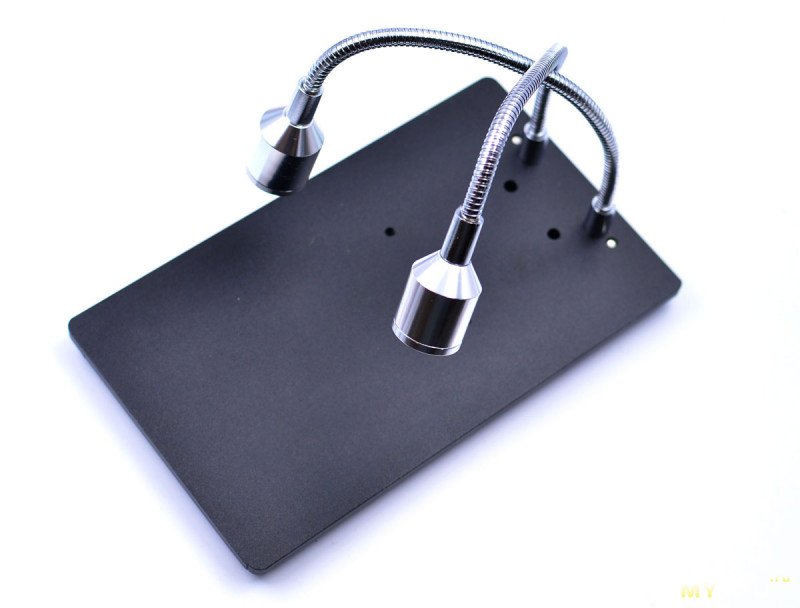
Supply external backlighting through this 3.5mm "Nokiai" DC contact.
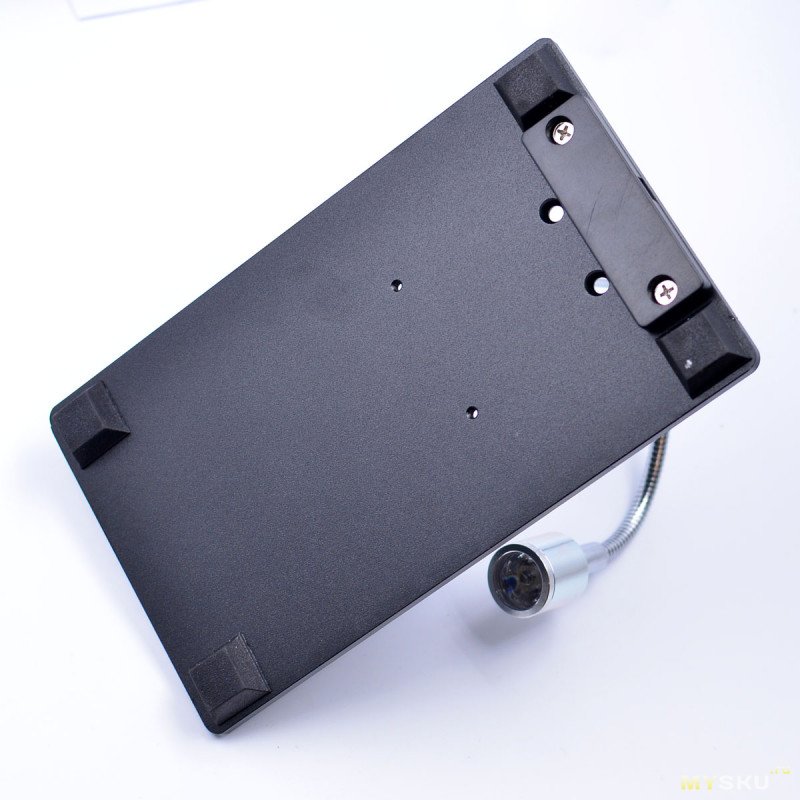
There are four rubber feets at the bottom to keep the table from sliding. They are quite massive.
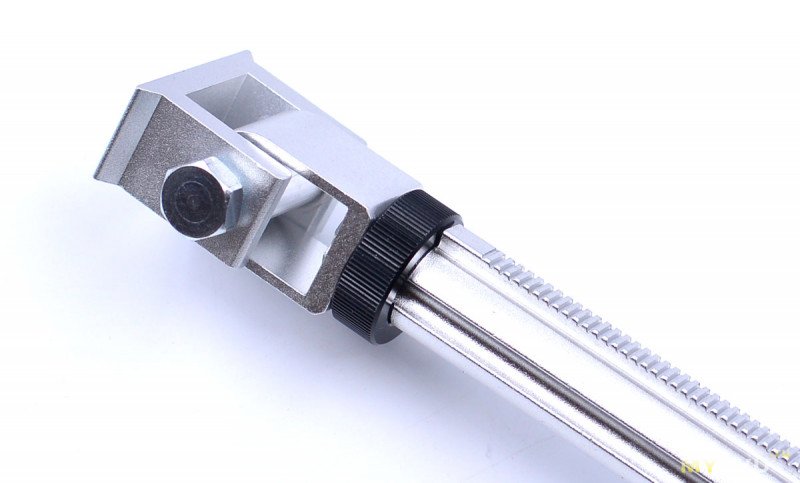
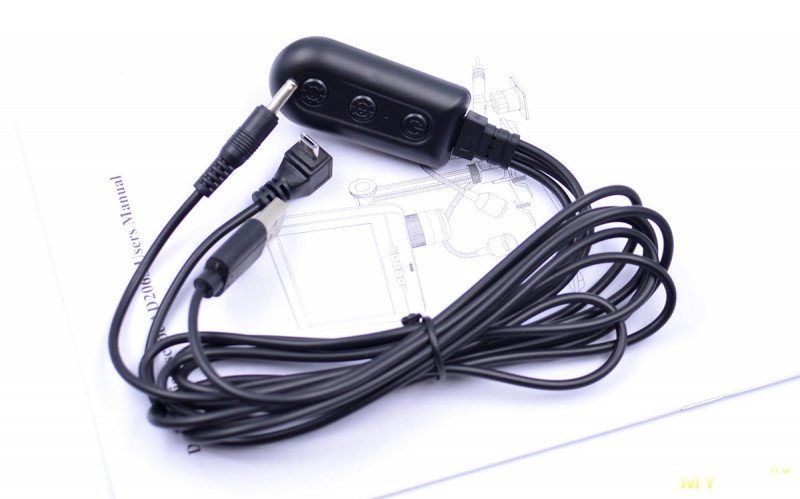
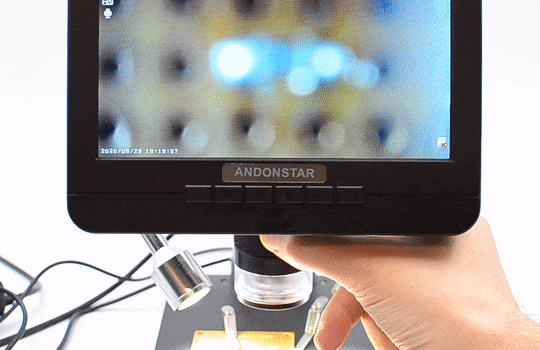
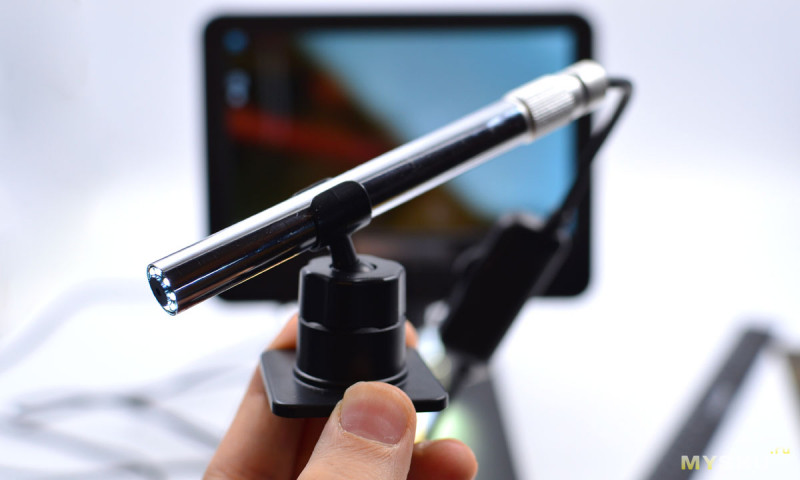
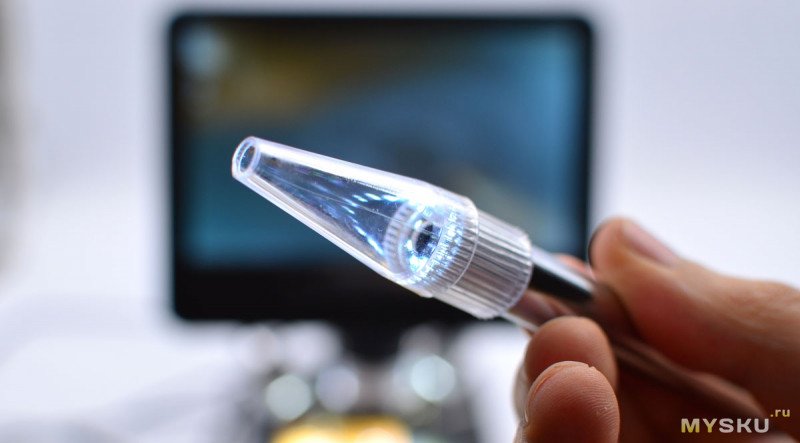
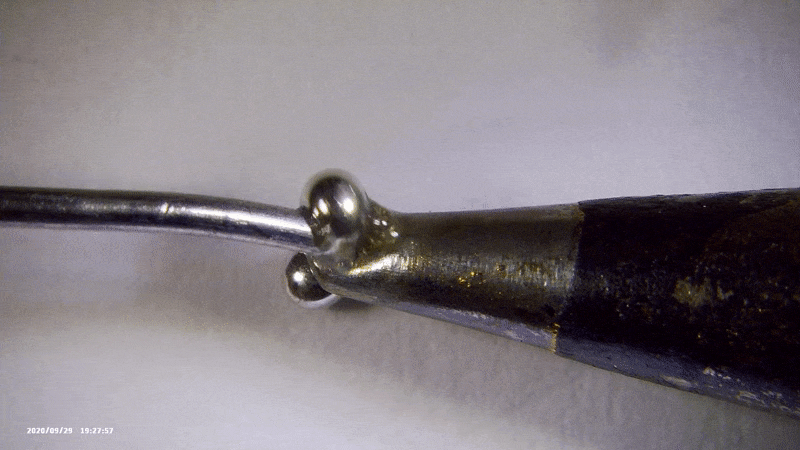
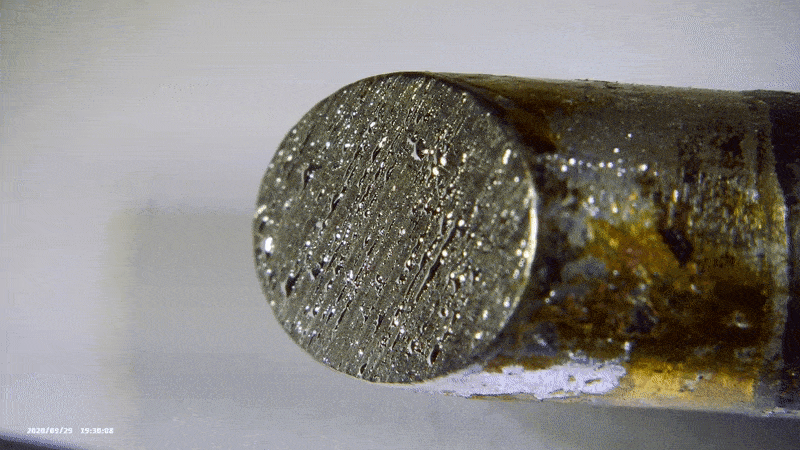
The microscope arm appears to be made of aluminum, but the build is good. The holder carriage can be moved along the vertical axis using the side knurled wheels. Nice to handle. The endoscope has a total length of 120cm, 13 of which are in the metal chrome body. The knurled ring on this body - adjusts focus. The cord also has a remote control with a wheel for adjusting the brightness of the backlight. Matrix resolution 0.3MP - standard 15 years ago :) 8-diode backlight. A branched cable through which the entire assembled microscope is powered: - INPUT: USB-A - OUTPUT: microUSB (to the microscope connector) + DC 3.5mm (to the external illumination connector on the stage)
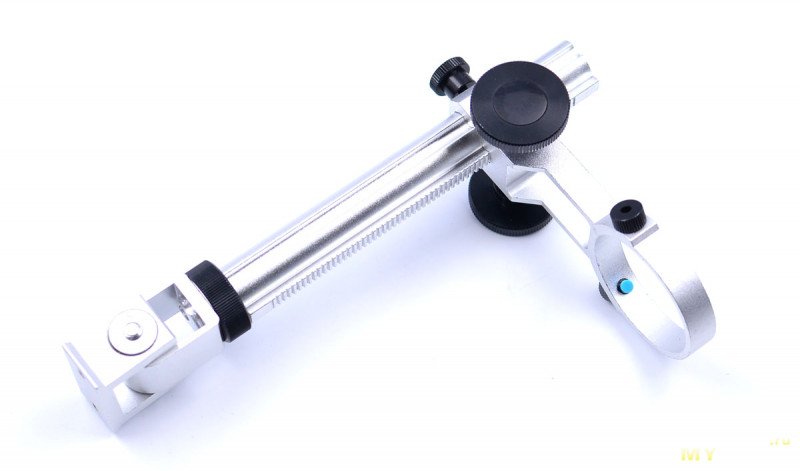
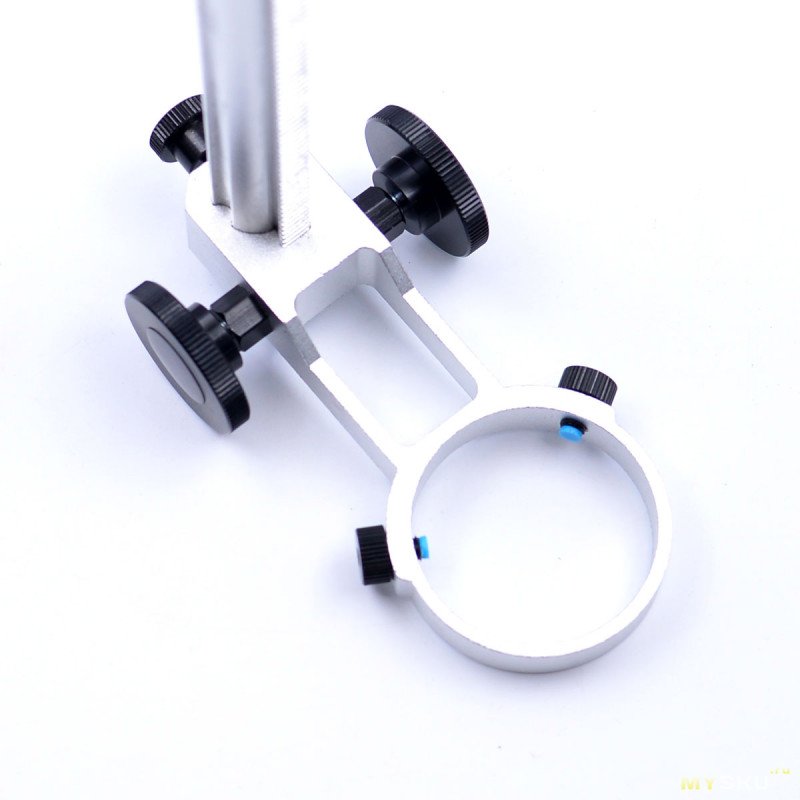
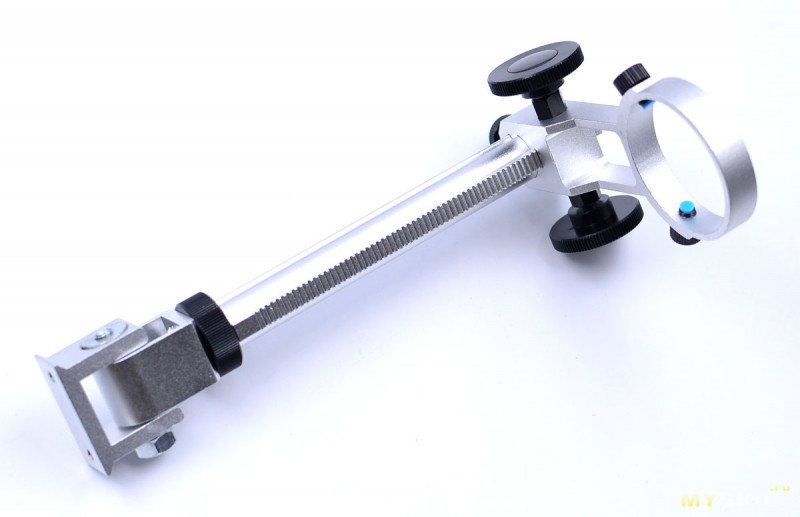

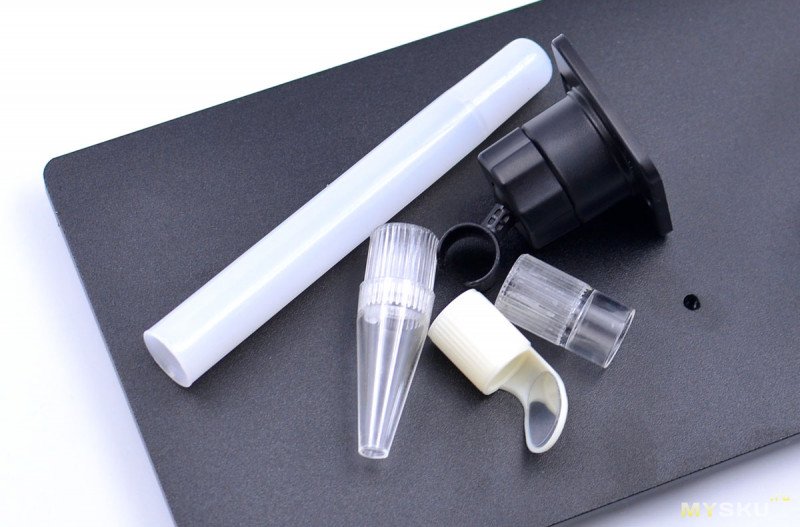
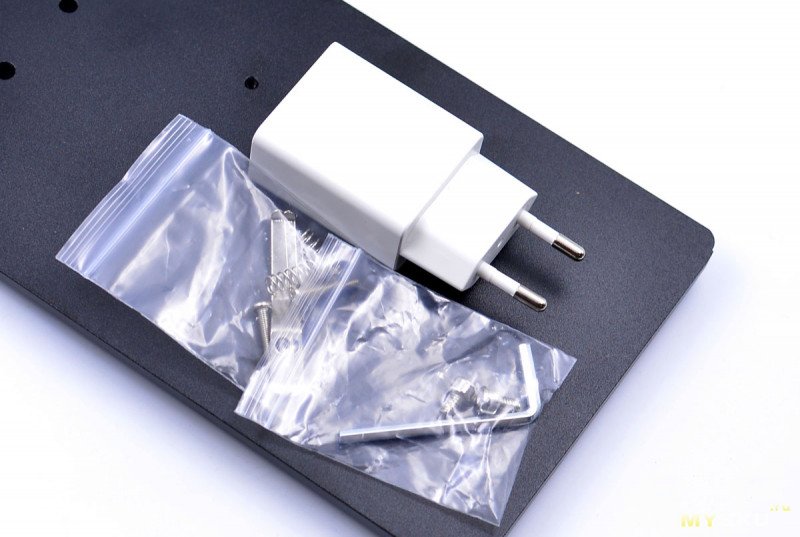
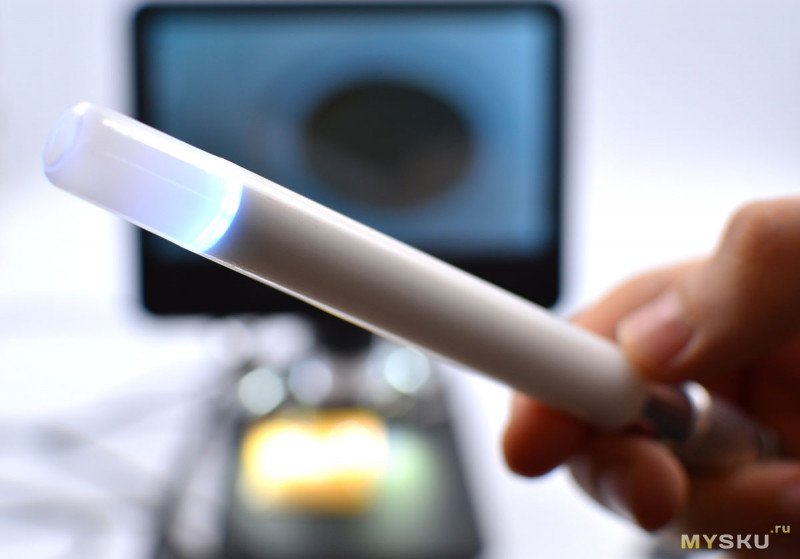
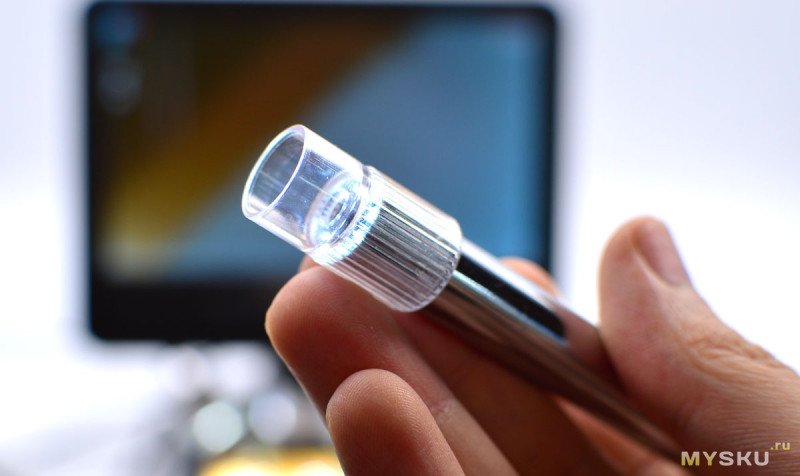
- remote control in the middle: turning the microscope on / off, adjusting the brightness of the external illumination A set of limiting nozzles and a holder for an endoscope: - a long white nozzle - conical (for the ear) - a cylinder-shaped one - a mirror nozzle - the endoscope holder itself Another set: - power supply 5V / 2A (Euro plug) - clamps-antennae for the table + screws with springs - hex screws for attaching the bracket to the table - L-shaped hex key
Also note that the board has a microphone, unused contacts for an external speaker, a grill for a speaker, but there is no speaker itself. The logic of this "decoration" is not clear to me.
Specifications
Name - Andonstar AD206S
Video resolution - 2MP
Photo resolution - 12MP
Max. recording resolution:
- main camera - 1080p
- portable camera - 480p
Monitor - 7 "
Power supply - USB-A 5V
Warranty - 12 months
Appearance
The packaging does not raise questions, it is well stocked. The most important part is a 7-inch monitor with a lens, which is held on a hinged mount. The screen is covered with a protective film.The most important part is the 7" monitor with a lens that is hinged on a swivel mount. Everything is made of plastic. The screen is covered with a protective film.
Interfaces and connectors:
- 3.5mm endoscope connection socket
- microSD card slot (up to 64gb)
- activity LEDs
- microUSB input for power and wired remote control
- Closed, unrealized connector (there should probably be a USB-A for flash drives)
- factory reset port
On the lens, you will notice longitudinal risks - it is a focus adjustment ring. Adjustment is smooth.
The front side of the lens is equipped with a circular illumination consisting of an array of 8 LEDs
And also covered with a protective glass with UV-filter, - when looking at an angle at the greenish glare is visible.
Device controls:
- power on
- zoom, gallery (briefly), settings menu (hold)
- up arrow (works only in menu)
- down arrow (to switch the view from the endoscope, the screen on the screen, or the whole screen)
- OK (start/stop video recording)
- take a picture
- ring light adjustment wheel
- a window above the backlight adjustment wheel (IR receiver for remote)
The complete remote control is more convenient and functional. Here you can start recording in one click, as well as freeze the image (HOLD), change the exposure, sharpness, discolor or invert the colors of the image, adjust the brightness of the microscope screen.
The object table is made entirely of metal. Coating - black powder paint, similar to the one used to cover computer cases. The size of the table is 12x20cm. Two powerful LEDs on flexible legs are attached to the table.
Supply external backlighting through this 3.5mm "Nokiai" DC contact.
There are four rubber feets at the bottom to keep the table from sliding. They are quite massive.
The microscope arm appears to be made of aluminum, but the build is good. The holder carriage can be moved along the vertical axis using the side knurled wheels. Nice to handle. The endoscope has a total length of 120cm, 13 of which are in the metal chrome body. The knurled ring on this body - adjusts focus. The cord also has a remote control with a wheel for adjusting the brightness of the backlight. Matrix resolution 0.3MP - standard 15 years ago :) 8-diode backlight. A branched cable through which the entire assembled microscope is powered: - INPUT: USB-A - OUTPUT: microUSB (to the microscope connector) + DC 3.5mm (to the external illumination connector on the stage)
- remote control in the middle: turning the microscope on / off, adjusting the brightness of the external illumination A set of limiting nozzles and a holder for an endoscope: - a long white nozzle - conical (for the ear) - a cylinder-shaped one - a mirror nozzle - the endoscope holder itself Another set: - power supply 5V / 2A (Euro plug) - clamps-antennae for the table + screws with springs - hex screws for attaching the bracket to the table - L-shaped hex key
Assembly
At first I thought it would take a long time, but in the end, the assembly took 5 minutes. One: two: A few words on the connectors. Since the 3.5mm audio jacks and DC connectors are the same, I confused them at first and inserted the powered DC plug into the circular connector on the microscope. Fortunately, nothing happened. But the endoscope connector must be inserted into the round connector on the microscope. I have already met this type of external illumination earlier in someone's reviews on YT, I have long wanted to try it in work.Parsing
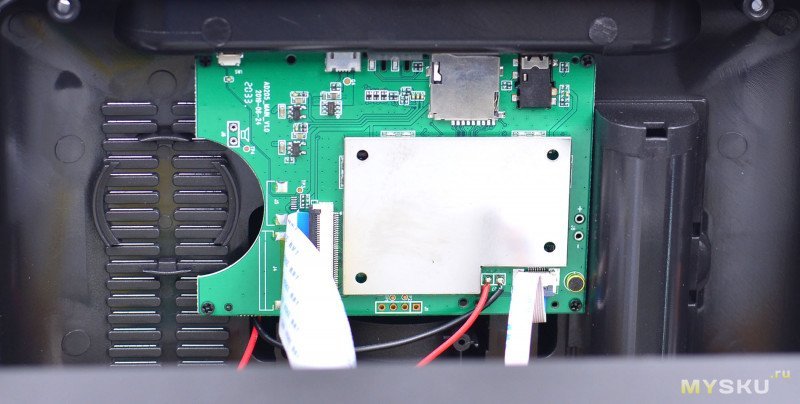
Having disassembled more than one digital microscope, I noticed a tendency that manufacturers like to hide the key chips and microcircuits used, by rubbing the markings with a CNC engraver, or, as here, by covering the microcircuits with a metal protective screen. The monitor and the motherboard are connected using a ribbon cable that can be connected as needed - using clamp connectors. On the right, you can see a holder suspiciously suitable in shape for 18650 batteries. You should take note if you suddenly decide to organize a completely autonomous device.Also note that the board has a microphone, unused contacts for an external speaker, a grill for a speaker, but there is no speaker itself. The logic of this "decoration" is not clear to me.
Menu
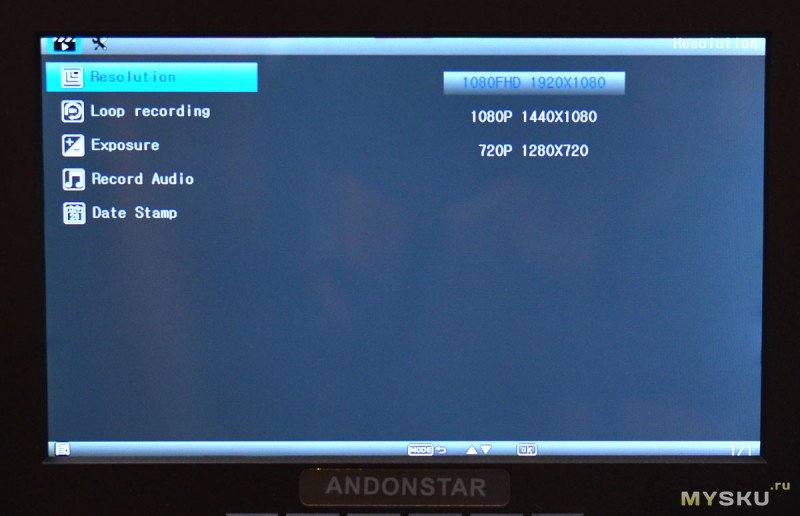
The Menu can be accessed by long pressing the M in front of the monitor, or by pressing the button once on the remote control. From the settings in this menu, you can:- change the resolution (1080p (16: 9/4: 3), 720p)
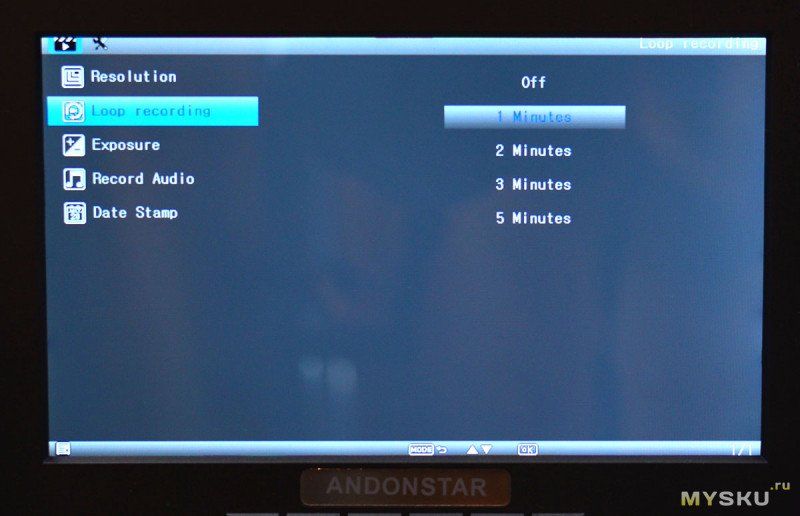
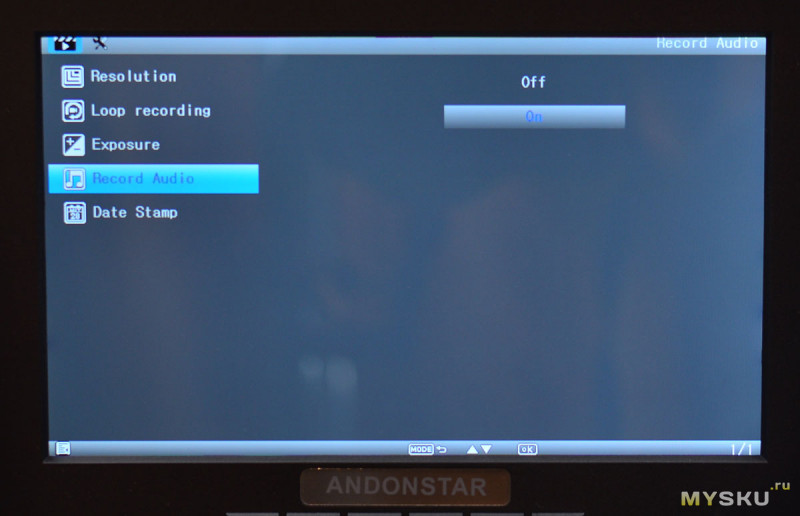
- loop recording (off, 1, 2, 3, 4, 5min)
- adjust the exposure (+ 2.0 ... -1 / 3)
- record sound or not
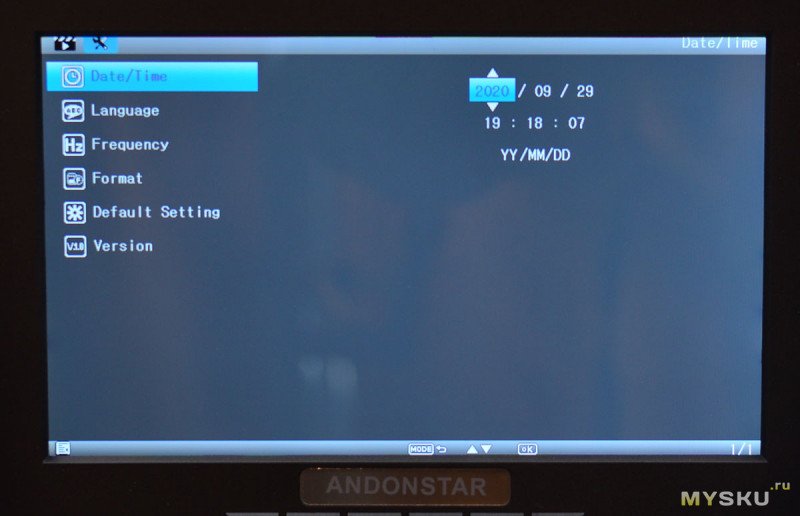
- set the date / time
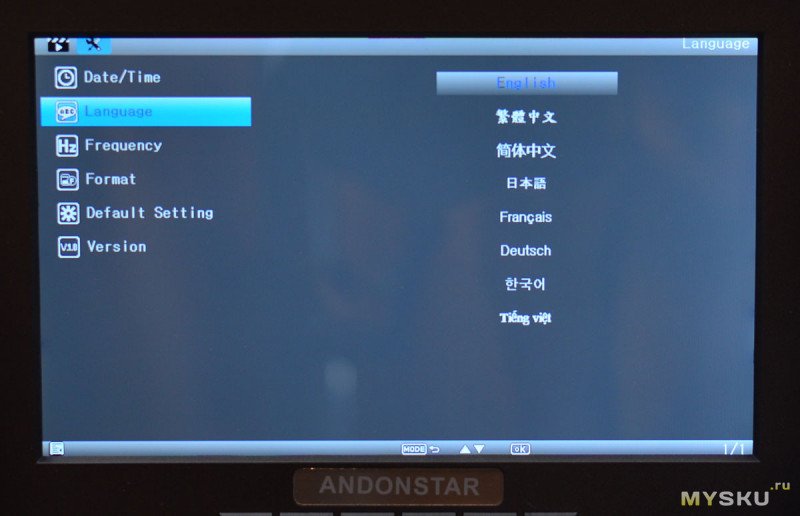
- change the language (there is also Russian)
- eliminate flickering (50 / 60Hz)
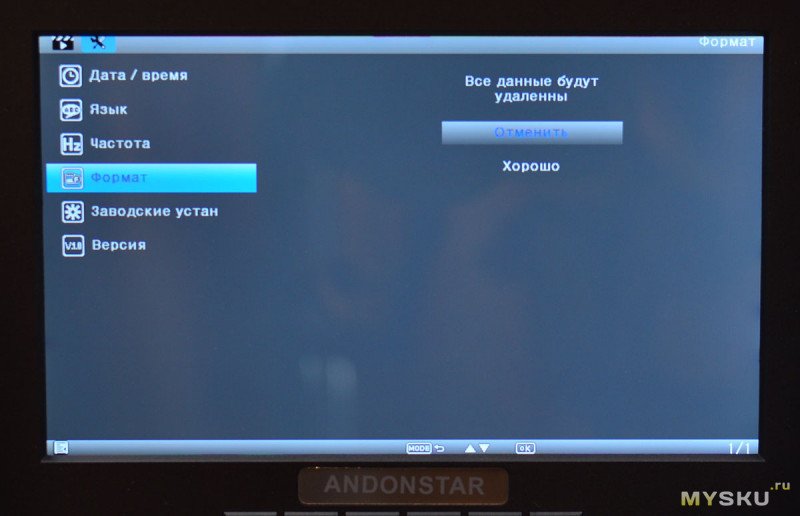
- format the memory card
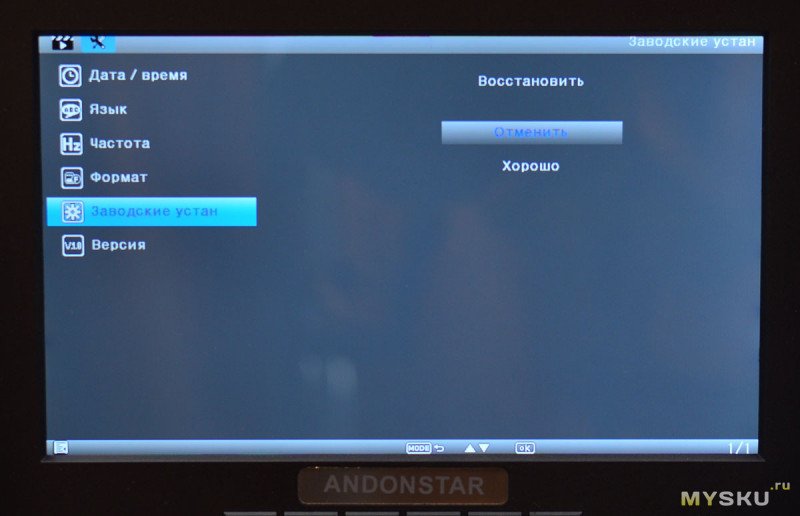
- reset settings
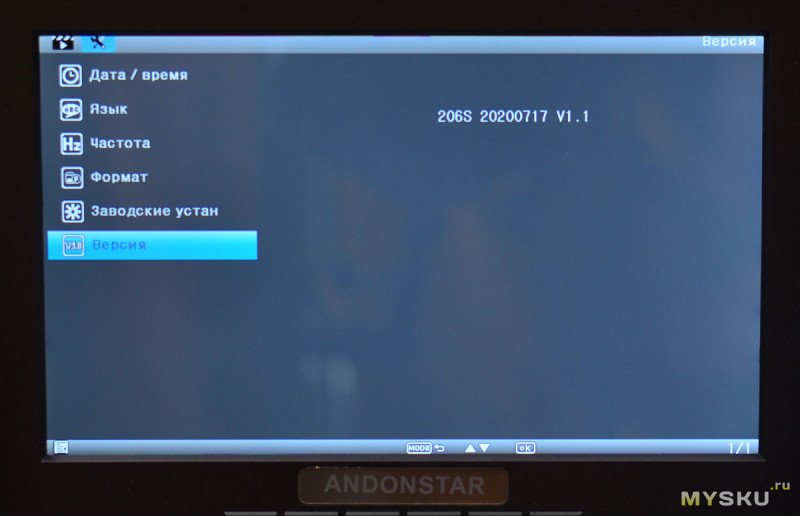
- firmware version 1.1 (dated July 17, 2020)
At work. What is how is regulated
The structure itself can be raised or lowered vertically, in addition, you can separately rotate the screen by folding it up or placing it straight in front of you. If the nut is loosened at the base of the bracket, it will be possible to position the microscope lens not perpendicular to the table, but at a certain angle. I powered the microscope from a power bank. Switching on can be done either by the button under the screen, or by the button from the wired remote control. You cannot turn on or off the microscope using the remote control. The focus is adjusted either by the focusing ring or by lowering / raising the structure vertically. I note that the stability and knock of the structure is sufficient so that the image does not shake when the adjusting rings are rotated.


Using the central wheel on the front side of the monitor, you can change the brightness of the backlight, you can turn it off altogether. The external backlight cannot be adjusted from the remote control before it is turned off. The illumination of the endoscope can be fully adjusted. Both the recording of materials and the refresh rate of the screen are limited to 30Hz. From what, with fast movements, you can notice a delay, and with the effect of "jelly" By the way, about working with an endoscope. Its focus is regulated within a very wide range, up to infinity. But working with him was not so easy - the very shallow depth of field is to blame. The natural shaking of the hands is very difficult when shooting small subjects. Tripod required. In the kit, by the way, there was one.

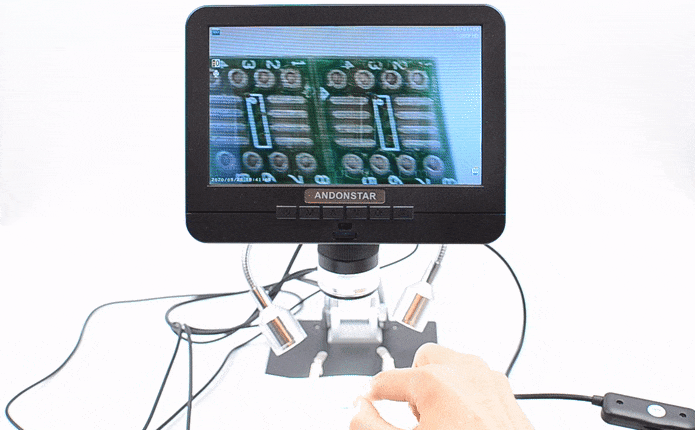
Also, for a more or less stable fixation of the camera, all sorts of limiting attachments are included in the kit. What is convenient, you can display an image from two cameras at once using the "picture in picture" type on the microscope screen, or even switch to the endoscope camera. The material is always recorded from two cameras at once - the files are placed in different folders.

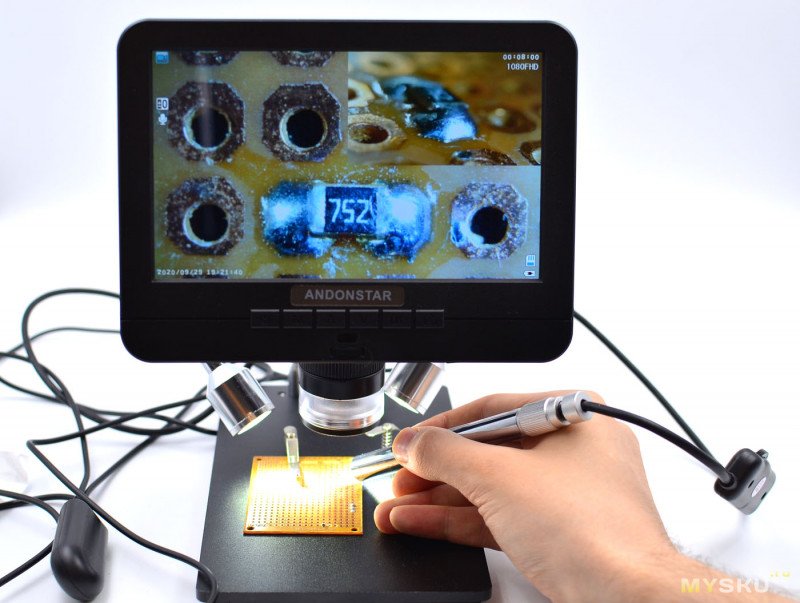
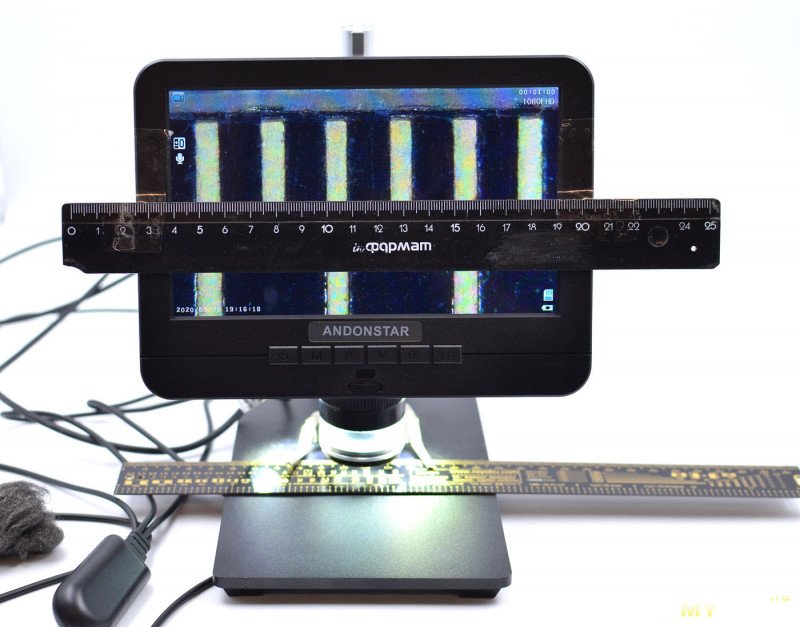
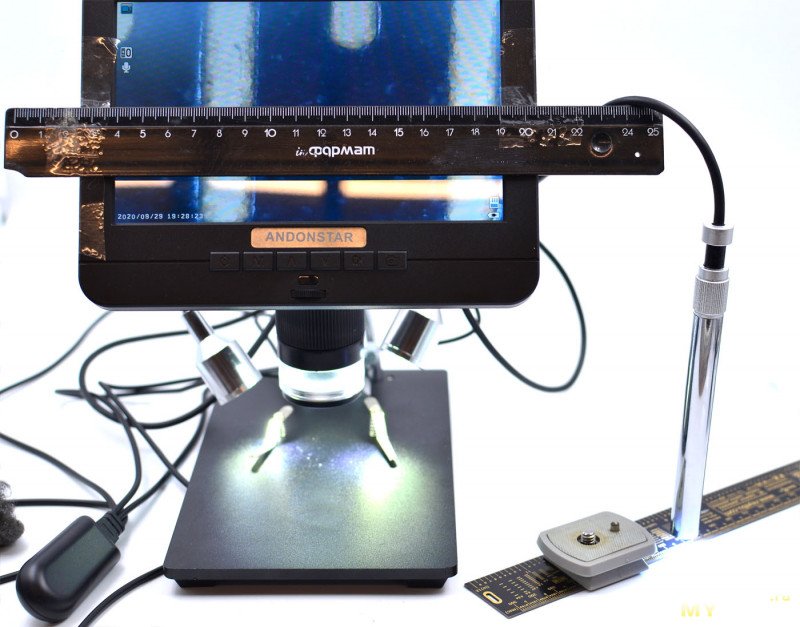
The magnification factor was measured in the simplest proven way - two rulers and "how many millimeters fit in 1 millimeter" on the screen of this microscope, since it is supposed to work behind this monitor. The method does not claim to be absolutely accurate, but nevertheless, it will be clear and understandable what scales to expect. Measurements were carried out at the minimum focusing distance. The main camera showed a magnification of 50x (50mm in 1mm), while the endoscope camera showed a magnification of 100x (100mm in 1mm).
Samples
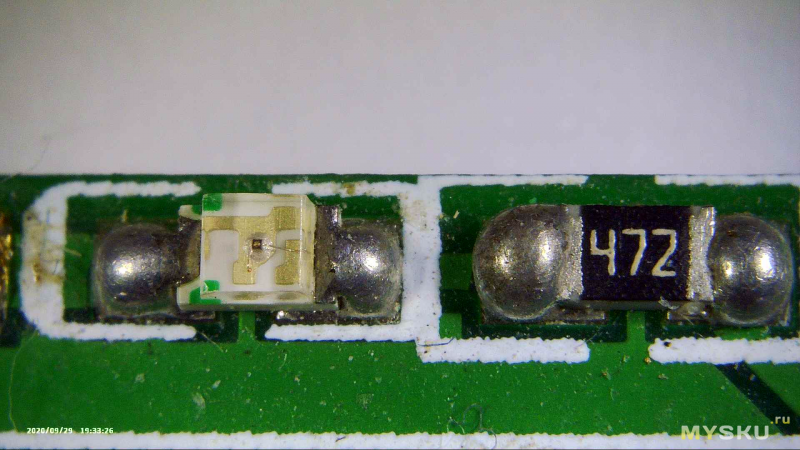
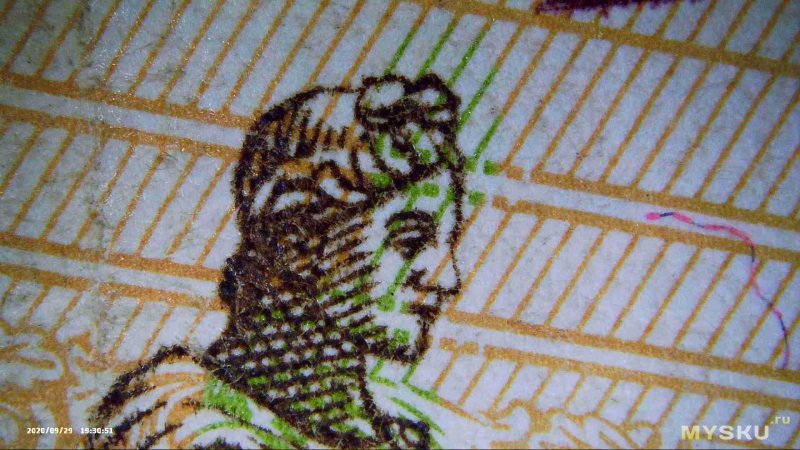
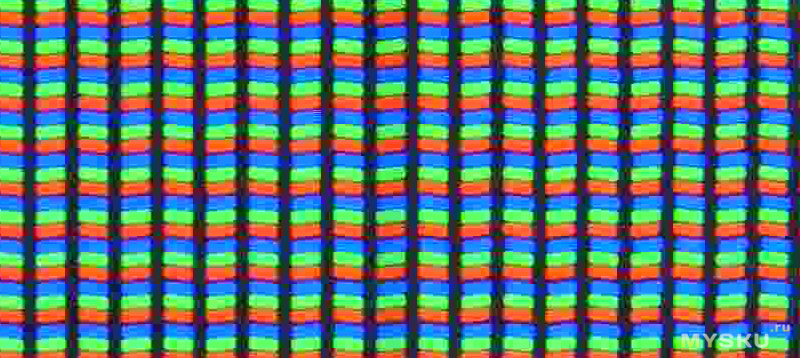
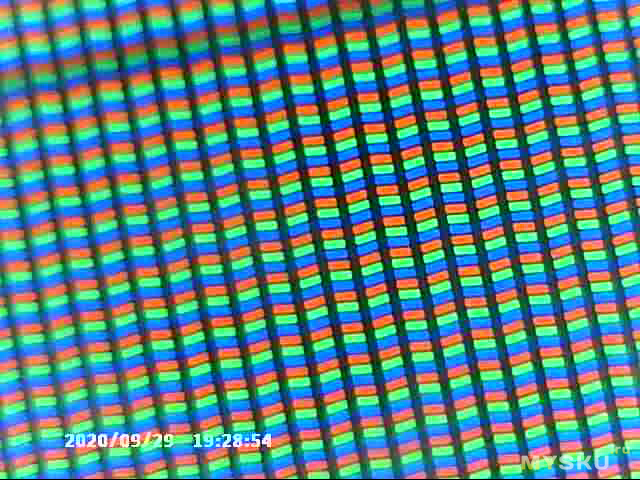
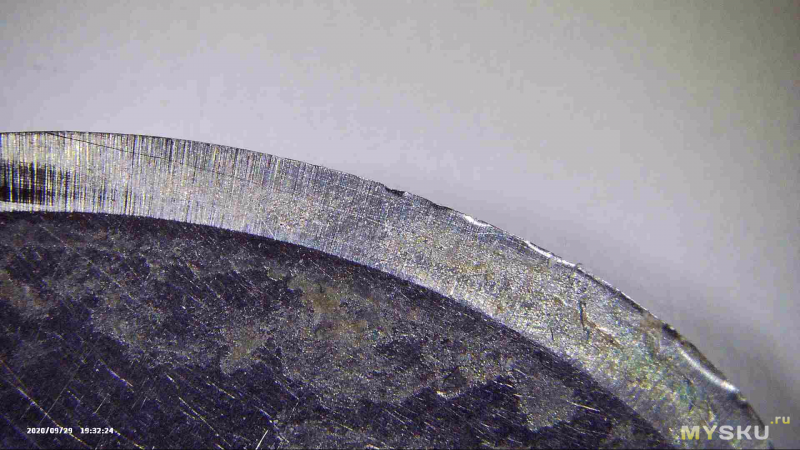
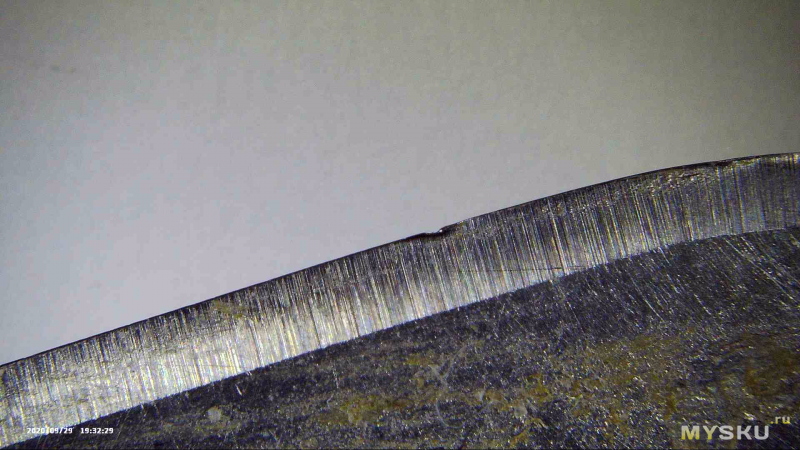
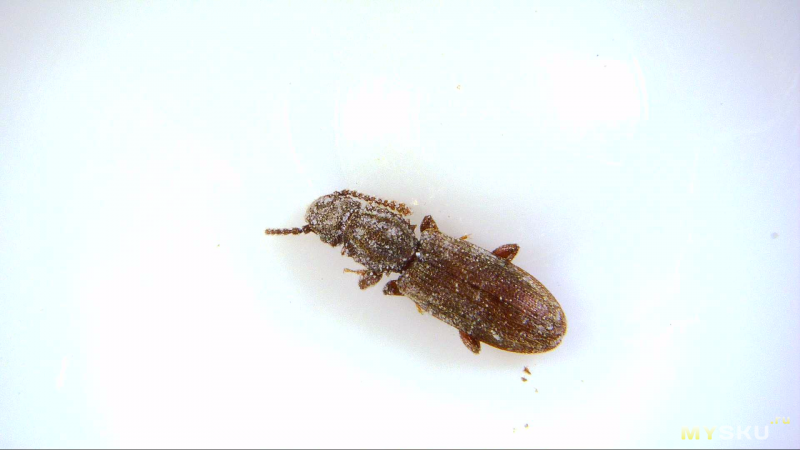
A few examples of how both cameras shoot.SMD resistor 0805 ( download original video 1080p ) SMD LED 0805 ( download original video 1080p ) The same LED through the endoscope lens ( download original video 480p ) Apollo profile (download original video 1080p) Smartphone screen pixels (download original video 1080p) Crop 100% Here you can see very clearly that there is not enough bitrate when encoding video. The image splits into cubes. Through endoscope lens (download original video 480p) Cutting edge of scalpel (download original video 1080p)


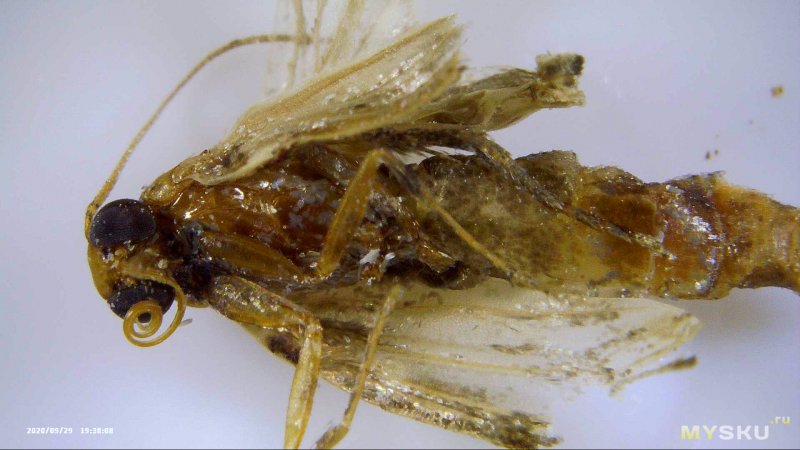
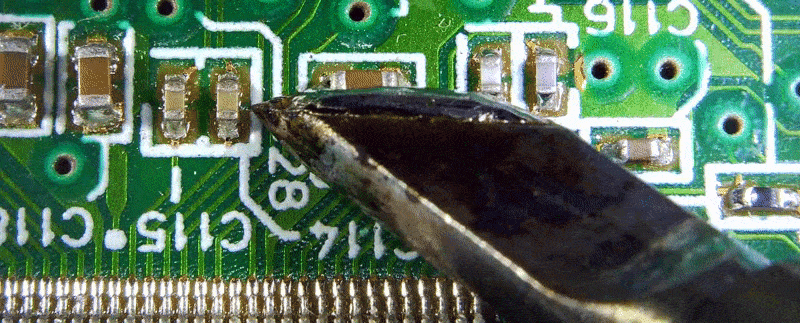
Mummies of two insects found on the balcony (download original video 1080p - [1] , [2] ) Sample with increased exposure Melting solder on the TS-BL tip (download the original video 1080p) Melting the solder on the TS-BC3 tip (download the original video 1080p) Removing the SMD capacitor (download the original video 1080p) Returning the SMD capacitor to its place (download the original video 1080p) Endoscope focused at infinity works like a regular camera (download original video 480p) Front lower teeth, taken with an endoscope with a mirror (download original video 480r)


The penultimate lower tooth with a temporary filling, removed with an endoscope (download the original video 480p) .
Here I want not so much to show as to tell a story and even ask an opinion. This tooth should have been filled for me. I have been visiting the dentist since the end of May - then I got the first temporary filling. 5 months have passed. Probably 6 temporary fillings with different types of drugs were replaced. Even more injections were made in the gums, the gel was injected several times. The therapist motivates this by the fact that the tooth needs to be reduced in mobility (although he did not notice that he is staggering), then remove the inflammation of the gums (just numerous gel and injections). Although, when brushing teeth, nothing bleeds anywhere and in general there are no complaints of pain. The filling of the canals has not yet taken place - they are constantly being transferred. I visit about once a week for this long time. Was it like that?

Conclusion
The image quality is acceptable, however, compared to my main microscope, a smaller dynamic range is felt. There are no complaints about the convenience. If you remember what a terrible holder was for a cheap Mustool G600 microscope on a suction cup, which was actually borrowed from car DVRs, then here is the complete opposite, the design due to a metal bracket and a table is rigid - when adjusting the focus, the picture does not shake.What I liked most about this microscope was the implementation of external illumination. I had an opinion before that side illumination gives the picture a certain volume, texture and greater contrast. This copy only confirmed it. On my main microscope, I will most likely do the same. However, there is no possibility from the remote control to completely reduce the brightness until it is turned off. Just pull the cord out of the table. Flaw. With ring and endoscopic illumination in this regard, everything is fine, their brightness can be unscrewed until completely turned off.
It remains a mystery why the manufacturer removed the speaker, but left the microphone at the same time, and even added a setting to turn it on / off in the menu. In theory, I think that the recording of speech comments during work is necessary. On the other hand, if there is a microphone, why hide it inside, if you could bring it out through a hole in the case? As for the sound recording quality in this situation, it is so barely audible that the voice is practically inaudible.
As for the power supply, the device is not autonomous - you will need to use a power supply unit, or, as in my case, a power bank. However, inside the device there is a holder for a lithium 18650 cell. So if you wish and direct hands, there is a chance to make the device completely autonomous.
- recording is carried out in two streams from two cameras
- writes from the main camera in fragments of 250 MB
- low recording bitrate - cube
- only 30Hz (FPS) in all modes
- fair FullHD, VGA to the endoscope
- in addition to video, sound is recorded, but audibility is minimal
- high-quality external illumination
- very small depth of field at the endoscope, it
is difficult to use - the image response speed is not the highest, after all 30Hz, the jelly effect
- ring illumination: adjustable until it is completely turned off
- external illumination: from the remote control it is not regulated until it is completely turned off
- endoscopic illumination: it is adjustable until it is completely turned off
- cannot sync with PC
- does not have its own battery, but it is possible to build in 18650. The
The original text was written by CTAHOK and published at mysku.ru. All right reserved to the author.
URL of the original text:Цифровой микроскоп Andonstar AD206S с монитором и эндоскопом